So broadly speaking there are two ways to backup an Apple Mac computer to a local external hard drive. The easiest method is to use Apple’s own software, Time Machine, that comes pre-installed on every Mac with OS X since v 10.5. An alternative method for more advanced users is to create a disk image of your Hard Drive or data with third party software.
It is, of course, possible to back up individual files and folders manually by drag and drop. There’s nothing wrong with doing that but this article outlines the advantages and methods of backing up your whole system.
The most common reasons to resort to a backup are internal hard drive mechanical failure and the accidental deletion of files. Hard drives failing might be a rare event for most ordinary users but people who work with computers see this very often and all hard drives have a limited lifespan. In most cases, the computer becomes obsolete before the hard drive fails but this is not always the case. Other reasons to use a backup might be file corruption, theft, malware attack, water damage, fire and damage caused by electrical surges.
To use the advice in this article you’ll need to have a storage device to hand, preferably an external hard drive. If you are trying to back up an iOS device or are looking to store data in the cloud, there is a brief section at the bottom about that.
Easy
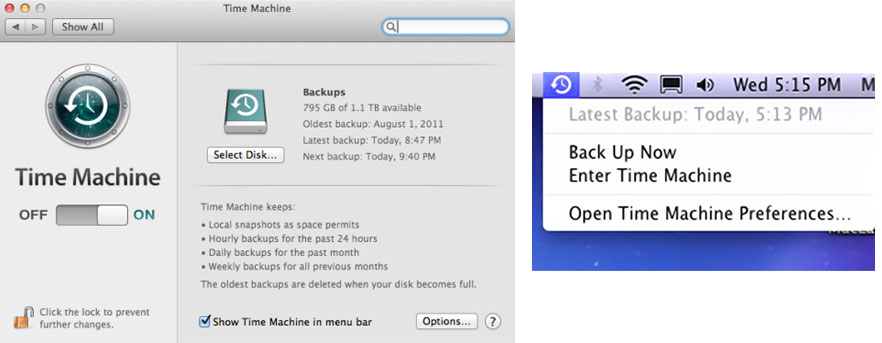
Use Time Machine. Get an external hard drive with a larger capacity than your computer hard drive and follow the messages that come up on screen to use the device as a Time Machine volume. The drive will need to be formatted “Mac OS Extended” but the system will usually prompt you to do this. If it doesn’t happen, it’s quite easy to erase a hard drive with Disk Utility which can be found in the Utilities folder within the Applications folder.
Time Machine will backup your Mac constantly. The advantage of Time Machine is that you can go and delve into the past to retrieve files that you have long since lost or deleted. You should use a hard drive or a partition of one just for Time Machine. Time Machine backups can also be used to restore your whole system should the internal hard drive fail. If Time Machine fails to backup, it will give you a warning which should not be ignored.
Time Machine can be set up from the System Preferences panel and you may see a clock icon at the top right of the menubar. If it’s not there it can be activated from the Preferences panel.
Advanced
You might be looking for an alternative or a second method of backing up that you can use alongside Time Machine. Here’s a way to create a disk image of your hard drive onto an external hard drive and automate the process daily, weekly, whatever suits you. Go and visit the nice people at Shirt Pocket and download Superduper! It might sound too good to be true but you can image your whole disk for free and buy the upgrade for less than £25 to schedule backups if you want to automate the process. (I have no affiliation with Shirt Pocket whatsoever).
There is one downside to using Superduper! It is not particularly suitable for the technophobe in the way that Time Machine is. If you’re used to downloading and installing software then it might not be a problem for you at all. Superduper! creates a disk image (sparseimage) of your hard drive that can be mounted on your desktop similar to disk images that you may have used while installing software. Once mounted, you can browse your hard drive from the backup and copy files back to your hard drive if needed. These disk images can also be used to restore your whole system to a new drive should the old one fail.
If Superduper! fails to backup your drive, you’ll get a warning message, don’t ignore it.
The Third Way is in the “Cloud”
You may have heard of Dropbox, iCloud Drive and other such online “cloud” services. If you still have concerns about things like fire or theft of equipment, an additional idea would be to use one or more of these online services. To backup your whole hard drive this way may well be impractical for ordinary broadband speeds as upload speeds are often 10 or 20 times slower than downloads.
However, manually copying important data onto one of these cloud services could be a great idea to give you an additional layer of protection from data loss. Just remember when doing so that some of these services actually move the files rather than copying them when you drag and drop. It would usually be wise to keep copies on your device too. Make sure you are copying files rather than moving them (unless you want to for some reason e.g. to save space on a hard drive).
TOP TIP: When you want to copy a file rather than move it, hold down the option key on your keyboard whilst dragging. You’ll see a green plus icon to indicate the making of a copy rather than just moving to a new location.
iOS
If you are concerned about backing up an iPad, iPhone etc, this can be easily done by using Apple’s iTunes software, even if you don’t use iTunes for music, here is where you can sync and backup your iOS devices. That will be covered in another article.